`` request_header_access Accept-Language deny all request_header_replace Accept-Language en-US
Node.jsのMySQLでAsync/Awaitで接続する
環境
- Nodejs 12
やりたいこと
Nodejsを使ってMySQLに接続したい。今どきのasync / awaitを使っていい感じに書きたい。というかコールバック書きたくない
インストール
有名なのは mysql なのだが、mysql2というのもある。
すごく昔にsidorares/nodejs-mysql-nativeがあったが開発終了、mysql2として1からコードを書き直したとのこと。mysqlとAPIの互換性があり、派生いわく「パフォーマンスは本家より優れている」とのこと。
せっかくなので今回はmysql2を使ってみる。
接続
async/awaitを使う上でのポイントは、通常の require('mysql2')だとコールバックしか使えないので require('mysql2/promise')でrequireする必要がある。一方promiseでrequireした場合はコールバックは使えない。
以下接続してselectするまでのサンプルコード
const mysql = require('mysql2/promise');

(async () => {
  const connection = await mysql.createConnection(
    {
      host:'127.0.0.1',
      user: 'user',
      password: 'pass',
      database: 'xxxxxx'
    }
  );
  try {
    const sql = 'select * from users limit 10';
    const [rows, fields] = await connection.query('select * from users');
    for (const val of rows) {
      console.log(val.id, val.name);
    }
  } catch(e) {
    console.log(e);
  } finally {
    connection.end();
  }
})();
あとは必ず終了時に connection.end(); をしないと終了されない。
プレースホルダーを使う
SQL中に ? を書き、SQLのあとに値を渡すと自動でエスケープしたSQLを生成して投げてくれる。
const [rows, fields] = await connection.query('select * from users where id = ?', 2);
mysql.formatを使うとどんなSQLが生成されるのか確認できる。
console.log(mysql.format('select * from users where id = ?', 2));
// => select * from users where id = 2
レコードの追加
インサートする場合も同様に書けばおk。特にobjectをそのまま渡すことができる。
const user = {id: 10, name: 'taro'};
const res = await connection.query('INSERT INTO users SET ?', user);
console.log(res);
一括レコードの追加
複数で渡す時は INSERT INTO xxx SET は使えないので INSERT INTO xxx VALUES 構文を使う。一工夫必要で、
const users = [
  {id: 5, name: 'taro'},
  {id: 6, name: 'ziro'}
];
const res = await connection.query(`INSERT INTO users (${Object.keys(users[0])}) VALUES ?`, [users.map(x => Object.values(x))]);
console.log(res);
のようにすると
INSERT INTO users (id,name) VALUES (5, 'taro'), (6, 'ziro')
のSQLが発行され無事1回のSQLで2レコードが一括で追加される。
参考リンク
Alpine Linuxで日本語の明朝体フォントを使えるようにする方法
環境
- Docker
- Alpine Linux 3
やりたいこと
Dockerで軽量イメージを作る上で欠かせないAlpine Linuxで日本語フォントを使う場合、実は
RUN apk add font-ipa fontconfig && fc-cache -f
を実行するだけで日本語は表示できる。が、今回は明朝体もきれいに表示させたい。
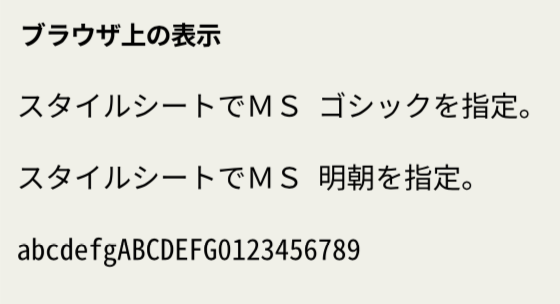
そのままだと以下のようにすべてゴシック体で表示されてしまう。

ちなみに今回はdockerの中ということもありrootでしか扱わない前提で話す。
まずはインストール
今回は表示の綺麗さに定評のあるGoogle Noto Fontsを使う。ゴシップ体だけ使うのであればすでにパッケージが出ているので apk add font-noto-cjk で入るが、今回は明朝体もほしいので手動で入れる。最後 fc-cache を実行するのを忘れずに.
RUN wget -q https://noto-website-2.storage.googleapis.com/pkgs/NotoSansCJKjp-hinted.zip \
    && unzip NotoSansCJKjp-hinted.zip \
    && wget -q https://noto-website-2.storage.googleapis.com/pkgs/NotoSerifCJKjp-hinted.zip \
    && unzip -o NotoSerifCJKjp-hinted.zip \
    && mv *.otf /usr/share/fonts/TTF \
    && rm *.zip \
    && fc-cache -f
が、これだけでは明朝体は表示されない。。。
原因
以下のようにCSSで名指しでNoto Fontを書かれている場合はきちんと明朝体で表示できるので、インストール自体はちゃんと出来てるっぽい。
body {
    font-family: 'Noto Serif JP', sans-serif;
}
fc-match コマンドを使うと指定したフォントの時、どのフォントが使われるのか調べられるので試してみる。
# fc-match sans-serif
OpenSans-Regular.ttf: "Open Sans" "Regular"
あれ、Noto Fontくんは??????
どうもアルファベットだけのOpenSansというフォントが優先されてしまって結果的にserif系日本語フォントがないことになってしまいゴシップフォントが表示されてしまってるっぽい。
つまりOpenSansを抹消すればよい(乱暴
rm /usr/share/fonts/TTF/OpenSans*
が、結果は変わらず。。。
# fc-match sans-serif
OpenSans-Regular.ttf: "Open Sans" "Regular"
fontconfigでデフォルトフォントを変更する
結局のところCSSで「serif」を指定しても「Noto Serif CJK JP」が使われないのが悪い。
ってことで明示的に設定してあげる必要がある。
/root/.config/fontconfig に以下を作成し、
<?xml version='1.0'?>
<!DOCTYPE fontconfig SYSTEM 'fonts.dtd'>
<fontconfig>
<!-- Default serif fonts -->
 <match target="pattern">
   <test qual="any" name="family"><string>serif</string></test>
   <edit name="family" mode="prepend" binding="same"><string>Noto Serif CJK JP</string></edit>
 </match>
</fontconfig>
確認
# fc-match serif
NotoSerifCJKjp-Regular.otf: "Noto Serif CJK JP" "Regular"
キタ━━━━(゚∀゚)━━━━!!
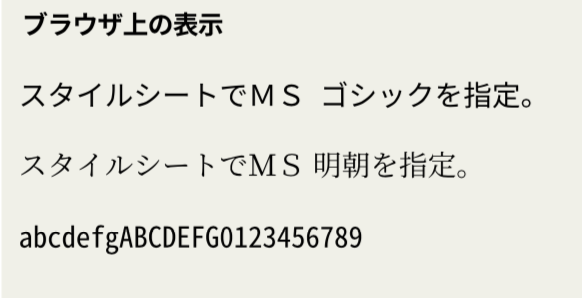
サイトでも確認してみる。ちゃんと明朝体表示になっている。

キタ━━━━(゚∀゚)━━━━!!
まとめ
今までをまとめると以下のコマンドになる。
RUN wget -q https://noto-website-2.storage.googleapis.com/pkgs/NotoSansCJKjp-hinted.zip \
    && unzip NotoSansCJKjp-hinted.zip \
    && wget -q https://noto-website-2.storage.googleapis.com/pkgs/NotoSerifCJKjp-hinted.zip \
    && unzip -o NotoSerifCJKjp-hinted.zip \
    && mv *.otf /usr/share/fonts/TTF \
    && rm /usr/share/fonts/TTF/OpenSans* \
    && rm *.zip \
    && mkdir -p /root/.config/fontconfig

ADD docker/fonts.conf /root/.config/fontconfig/fonts.conf
RUN fc-cache -f
- フォントをインストール
- 既存のserifフォントを削除
- fc-cacheを実行
できればserifフォントもapkでインストールできるようになればなぁ。。
参考リンク
Rubyでクラスメソッドを上書きする方法
環境
- Ruby 2.6
やりたいこと
方法1 class_eval
class Cat
  def self.hello
    "nyaa"
  end
end

Cat.class_eval do
  def self.hello
    "bowwow"
  end
end

puts Cat.hello
方法2 define_singleton_method
class Cat
  def self.hello
    "nyaa"
  end
end

orig = Cat.method(:hello) # 元のメソッドを呼びたい時は必要
Cat.define_singleton_method(:hello) do
  "#{orig.call} > bowwow"
end
puts Cat.hello
方法3 Module#prepend
class Cat
  def self.hello
    "nyaa"
  end
end

Cat.singleton_class.prepend Module.new {
  def hello
    "#{super} > bowwow"
  end
}

puts Cat.hello
Rubyでメソッドを色んな方法で上書きしてみる
環境
- Ruby 2.6
やりたいこと
使ってるGemの挙動を一部変えたくて、インスタンスメソッドを上書きしたい できれば黒魔術にならずにシンプルに変えたい
コード例ではCatクラスがあって、本来はhello()で「nyaa」を返すが「bowwow」に変更したい
うまくいかない例
- 普通にmoduleを作成してincludeする
- Rubyのクラス継承チェインの上位に上書きしたいmoduleが来てしまうため無理
# NOT WORKING
class Cat
  def hello
    "nyaa"
  end
end

module ExtendCat
  def hello
    "bowwow"
  end
end

class Cat
  include ExtendCat
end

cat = Cat.new
puts cat.hello
方法1 クラス継承
- 1番手っ取り早い、クラスを継承してメソッドを上書き
- 王道中の王道だが、rubyは多段継承を許してないので多用できない
class Cat
  def hello
    "nyaa"
  end
end

class MyCat < Cat
  def hello
    "#{super} > bowwow"
    # スーパークラスのメソッドはsuperで呼びさせるが、
    # 同じ引数が渡されることに注意 何も渡したくない場合はsuper()
  end
end

cat = MyCat.new
puts cat.hello
方法2 alias_method
- 既存とは別の名前でメソッドを定義して、エイリアス機能を使ってメソッドをすり替えるモンキーパッチらしい方法
- デメリットとして、エイリアスが被る可能性がある、新しいメソッドから古いメソッドを自動で呼べない
class Cat
  def hello
    "nyaa"
  end
end

module ExtendCat
  def new_hello
    "#{old_hello} > bowwow"
  end
end

class Cat
  include ExtendCat
  alias_method :old_hello, :hello
  alias_method :hello, :new_hello
end

cat = Cat.new
puts cat.hello
方法3 module#prepend
- モジュール内に変更したいメソッドを再定義し、クラスを再オープンしてモジュールを
prepend()する - うまくいかない例の
include()とは違い、モジュールで定義した方が優先されるため可能 - 方法2のやり方よりこっちのほうがよい
class Cat
  def hello
    "nyaa"
  end
end

module ExtendCat
  def hello
    "#{super} > bowwow"
  end
end

class Cat
  prepend ExtendCat
end

cat = Cat.new
puts cat.hello
方法4 委譲
- DelegateClassを使うと、クラスを引数として受け取りそのクラスのオブジェクトにインスタンスメソッドを委譲する事が可能
- DelegateClass(Cat)でCatオブジェクトにインスタンスメソッドを委譲するクラスが定義され、そのクラスを継承したMyCatクラスを定義することでメソッド実行を委譲している
class Cat
  def hello
    "nyaa"
  end
end

class Mycat < DelegateClass(Cat)
  def initialize(cat)
    super
  end

  def hello
    "#{super} > bowwow"
  end
end

cat = Mycat.new(Cat.new)
puts cat.hello
方法5 define_singleton_method
- そもそも特異メソッドとは、インスタンス固有のメソッドのこと(instance specific method)
define_singleton_method()を使うと特異メソッドを定義できるためメソッドの挙動を書き換えることができる- 他の方法と違って挙動を戻すことが可能
class Cat
  def hello
    "nyaa"
  end
end

cat = Cat.new
puts cat.hello

orig = cat.method(:hello) # 元のメソッドを呼びたい時必要
cat.define_singleton_method(:hello) do
  "#{orig.call} > bowwow"
end
puts cat.hello

# 元に戻す
cat.singleton_class.send(:remove_method, :hello)
puts cat.hello
方法6 refinements
- refinementsを使うと既存のメソッドの中身を一時的に変更できる
class Cat
  def hello
    "nyaa"
  end
end

module ExtendCat
  refine Cat do
    def hello
      "#{super} > bowwow"
    end
  end
end

using ExtendCat

puts Cat.new.hello
方法7 instance_eval
- instance_evalを使うとメソッドやインスタンス変数を拡張できる。当然上書きもできるってわけ
class Cat
  def hello
    "nyaa"
  end
end

cat = Cat.new
cat.instance_eval do
  def hello
    "#{super} > bowwow"
  end
end
puts cat.hello